Budget and change orders
Every renovation project has its own Budget and Change Orders tabs. The Budget tab is where you set what you expect to spend and log what you've actually paid. The Change Orders tab is where you document a change to that plan, mid-project, and route it for approval before it becomes part of the budget. This walks through both.
You'll need a renovation project already set up before either tab has anything to work with.
Open a project's Budget and Change Orders tabs
- Open the renovation project from your Projects list.
- Along the top, you'll see Overview, Team, Timeline, Budget, Change Orders, and Documents tabs.
Set your budget
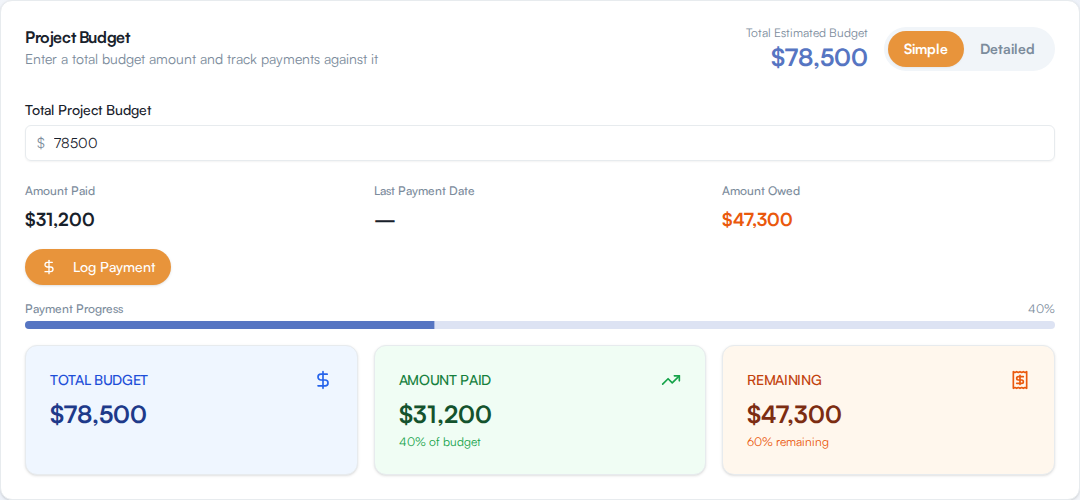
The Budget tab has two modes, switched with a pill control in the top right: Simple and Detailed. A new project starts in Detailed mode. Switching modes doesn't delete anything you've entered in the other one.
Simple mode
Use Simple mode if you just want one number to track against.
- On the Budget tab, switch to Simple.
- Enter a dollar amount in Total Project Budget.
That figure becomes your Total Estimated Budget, shown at the top of the tab and in three summary cards: Total Budget, Amount Paid, and Remaining, along with a payment progress bar.
To record money you've actually spent:
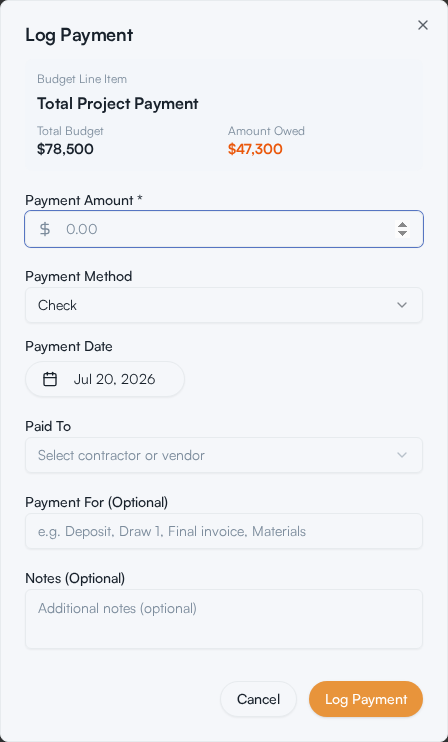
- Click Log Payment. This is disabled until you've set a total budget above zero.
- Enter the Amount, the date paid, a payment method (Check, ACH/Bank Transfer, Credit Card, Cash, or Other), who it was paid to, and what it was for.
- Save the payment.
What you should see: the payment appears in a Payment History table above the summary cards, and Amount Paid and Amount Owed update immediately. Click any row in the payment history to edit or delete that payment.
Detailed mode
Use Detailed mode to break the budget into phases and line items instead of one lump sum.
- On the Budget tab, switch to Detailed.
- If you haven't added any phases yet, click Add Suggested Phases for a standard renovation sequence (Planning & Permits, Demo & Foundation, Framing & Rough-Ins, Drywall & Paint, Finishes, Closeout), or Add Phase Manually to name your own.
- Inside a phase, click Add Line Item to [phase]. Give it a Category/Description (for example, "Kitchen cabinets"), optionally assign a contractor, and enter Labor and Materials costs. The line item's Total adds the two automatically.
- To log money paid against a specific line item, click Log Payment on that item and fill in the same fields as in Simple mode.
Line items don't have to belong to a phase. Use the Unassigned Items section at the bottom for anything you haven't sorted yet.
At the top of the tab, three cards track Estimated Budget (the sum of every line item's Total), Amount Paid, and Remaining, with the percentage of budget spent shown under each.
Warning
Removing a line item deletes its cost estimate and any payment history logged against it, and updates the project's total budget. This can't be undone once the project is saved.
What a change order is
A change order documents a change to the project after work has started: an unexpected repair, a material swap, added scope, a code requirement, and so on. Instead of quietly editing a budget line item, a change order records what changed, why, its cost, and any effect on the schedule, and puts it through approval before it counts. Each one keeps its own audit trail of who created it, who acted on it, and when.
Change orders are available on both the Silver and Gold plans.
Create a change order
- Open a project and go to its Change Orders tab.
- Click Create Change Order (or Create First Change Order if this is the project's first one).
- Fill in the Change Order Title and a Description of at least 10 characters.
- Optionally choose a Category (Unforeseen Conditions, Design Change, Scope Addition, Material Upgrade/Downgrade, Code/Permit Requirement, Weather/External Delay, Contractor Error/Correction, or Other) and a Related Project Phase, if the project has phases set up on its Timeline tab.
- Under Financial Impact, enter the Requested Amount. A preview shows your project's current budget, what's been spent, this change order's amount, and the resulting adjusted budget.
- Under Timeline Impact, choose No Impact, Minor (1-3 days), Moderate (4-7 days), or Significant (8+ days). Choosing anything but No Impact adds a Days Added to Schedule field.
- Under Contractor/Vendor Information, assign an existing project contractor, or choose Other/New Vendor and enter their company, contact, phone, and email. This is required.
- Optionally add a Quote/Bid Reference Number, attach supporting documents, and add Internal Notes for anyone reviewing the request.
- Click Submit for Approval.
What you should see: the change order appears in the Change Orders list with a Pending status, and the Change Order Summary cards at the top of the tab (Total Change Orders, Pending Approval, Approved, Budget Impact) update to include it.

Approve or reject a change order
Approving or rejecting a change order is an Admin capability. Creating one and submitting it for approval is something an Admin or a Power User can both do. See Roles explained for the full breakdown of what each role can do.
That submit/approve split only means something once more than one person is in your organization, which is a Gold-plan capability. On Silver, your organization is a single user, and that person is the Admin, so the same person who creates a change order is also the one who approves it. Nothing about the flow below requires a second person; it's just how the roles are set up once you add one.
To act on a pending change order:
- On the Change Orders tab, open the change order (click its row, or use the View option from its Actions menu).
- To approve it, click Approve Change Order. A confirmation shows the budget amount about to be added and, if the change order carries a timeline impact, how many days it will add to your schedule. Confirm to apply it.
- To reject it, click Reject, enter a reason of at least 10 characters, and confirm.
What you should see: the change order's status updates to Approved or Rejected, and its details record who approved or rejected it and when. The Change Order Summary cards update to reflect the new totals.
Note
A rejected change order still records the reason you gave, visible from its details, so anyone reviewing it later can see why it didn't move forward.
How an approved change order affects your budget
If your project's Budget tab is set to Simple mode, approving a change order adds its amount to your Total Project Budget automatically.
If your project is in Detailed mode, approving a change order does not create a budget line item for you. Add one yourself, in the appropriate phase, so the detailed budget reflects the approved change.
If the change order carried a timeline impact with days added, approving it also pushes your project's target completion date back by that many days (as long as the project already has one set).
Track a change order's history
Every change order keeps an audit log of what happened to it: when it was created, each status change, edits, and any files attached or removed, each with who did it and when. Open a change order and scroll to its Audit Log to see the full history. Files attached to a change order are listed under Attached Files, where you can view or download them.
To edit or delete a change order, use its Actions menu on the Change Orders tab. Deleting a change order can't be undone.